[ 목차 ] : 클릭하여 목차 이동
1. Form 연동 ( change event, submit, reset )
<%@ page language="java" contentType="text/html; charset=UTF-8"
pageEncoding="UTF-8"%>
<!DOCTYPE html>
<html>
<head>
<meta charset="UTF-8">
<meta name="viewport" content="width=device-width, initial-scale=1">
<link rel="stylesheet"
href="https://maxcdn.bootstrapcdn.com/bootstrap/3.4.1/css/bootstrap.min.css">
<script
src="https://ajax.googleapis.com/ajax/libs/jquery/3.5.1/jquery.min.js"></script>
<script
src="https://maxcdn.bootstrapcdn.com/bootstrap/3.4.1/js/bootstrap.min.js"></script>
<title>jquery form</title>
<script type="text/javascript">
$(document).ready(function() {
/* mybtn1 아이디 '버튼1'을 클릭하면
alert으로 nickName 아이디에
입력한 값이 출력되도록 한다 */
$("#mybtn1").click(function() {
alert($("#nickName").val());
$("#nickName").val("").focus();
});
/* 전송버튼을 누르면 전송하시겠습니까 의사를 물어본 후
확인시에만 전송한다 */
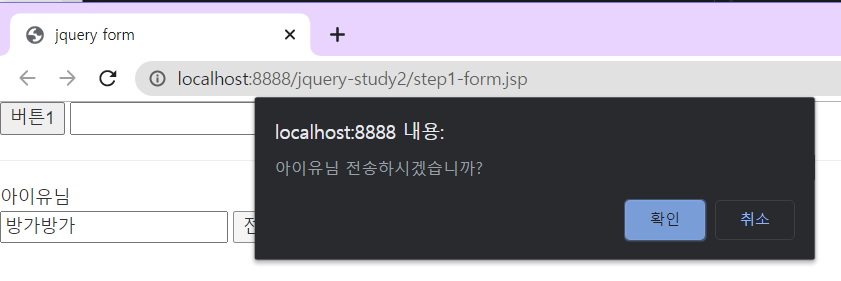
$("#testForm").submit(function() {
return confirm($("#memberName").text()+" 전송하시겠습니까?");
//return false; //false를 리턴하면 전송되지 않는다.
});
});
</script>
</head>
<body>
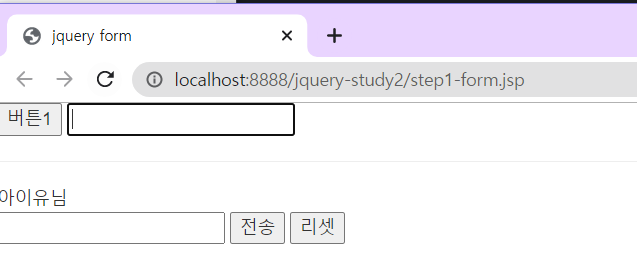
<button type="button" id="mybtn1">버튼1</button>
<input type="text" id="nickName">
<hr>
<span id="memberName">아이유님</span>
<form action="test.jsp" id="testForm">
<input type="text" name="nick" id="memberNick">
<!-- <input type="submit" value="전송"> -->
<button type="submit">전송</button>
<button type="reset">리셋</button>
</form>
</body>
</html>
1. 버튼1 눌렀을 때, 입력한 값이 뜬다.
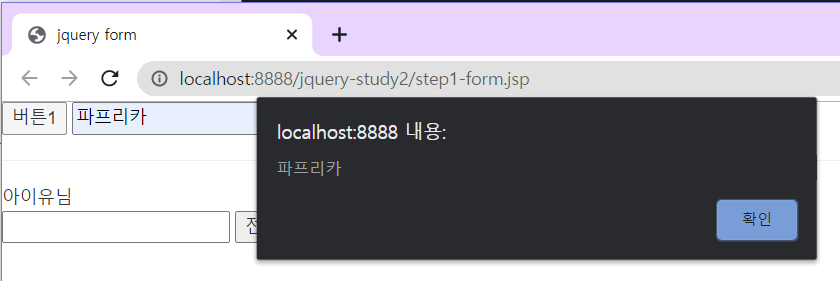
2. '확인'을 누르면 아이디를 입력했던 공간은 공란이 되고, focus - 커서가 그쪽으로 간다. (change event)
3. 전송 버튼 눌렀을 때, (취소 누르면 다시 돌아옴) - confirm 내용 안에 <span>tag의 값을 가져올 수 있다
4, 리셋 버튼 눌렀을 때, 입력한 값이 사라진다.
2. Table 제어 (하위/상위 태그 제어 - tr/td)
$(#[id] 하위태그:eq([index number] ) : id쓰고 한칸 띄고, index number번에 적용됨
$(#[id] 하위태그:contains([대상 문자] ) : contains 안에 '대상문자'가 있는 곳에만 적용됨
> 메서드 체이닝
$(this).parent().children().eq( [index number] ) : 상위태그의 index number번에 적용됨
<%@ page language="java" contentType="text/html; charset=UTF-8"
pageEncoding="UTF-8"%>
<!DOCTYPE html>
<html >
<head>
<title>jquery table</title>
<meta charset="utf-8">
<meta name="viewport" content="width=device-width, initial-scale=1">
<link rel="stylesheet" href="https://maxcdn.bootstrapcdn.com/bootstrap/3.3.7/css/bootstrap.min.css">
<script src="https://ajax.googleapis.com/ajax/libs/jquery/3.2.1/jquery.min.js"></script>
<script src="https://maxcdn.bootstrapcdn.com/bootstrap/3.3.7/js/bootstrap.min.js"></script>
<script type="text/javascript">
$(document).ready(function() {
$("#testBtn").click(function() {
//alert($(this).val());
//id가 friend인 대상의 하위 tr에만 css 적용
$("#friend tr").css("background", "yellow");
//html이 적용된 모습의 text로 나옴
alert($("#friend tr").text());
//html 코드 (태그포함)이 나옴
alert($("#friend tr").html());
//tbody의 id=friend의 하위 tr 중 3번째 tr을 선택
//css 적용
$("#friend tr:eq(2)").css("background", "yellow");
//tbody id=friend의 td 중 "당"이라는 문자열이
//포함된 td만 선택
$("#friend td:contains(당)").css("background", "orange");
});
$("#friend td").click(function() {
//td클릭 시 본인의 정보 alert으로 출력
alert($(this).text());
//클릭된 td의 상위(부모) tr로 이동하여,
//tr이 가진 첫번째 td의 text를 선택하여 출력
var info = $(this).parent().children().eq(0).text();//메서드 체이닝
alert(info);
});
});
</script>
</head>
<body>
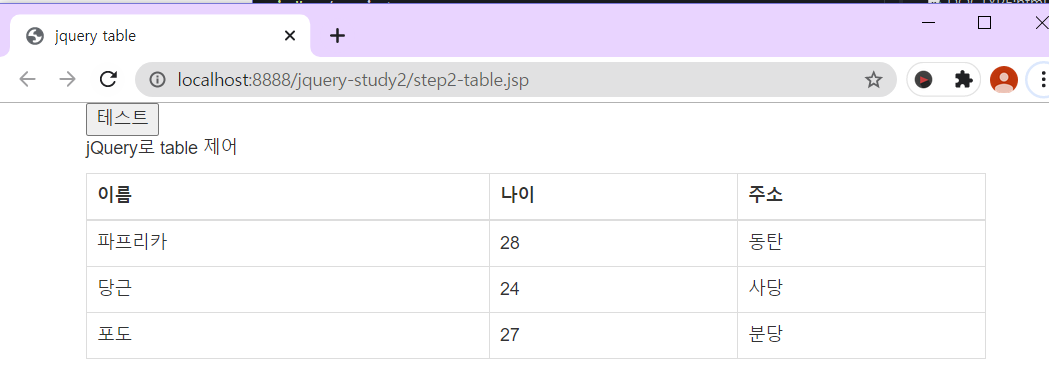
<div class="container">
<input type="button" value="테스트" id="testBtn">
<p>jQuery로 table 제어</p>
<table class="table table-bordered table-hover">
<thead>
<tr>
<th>이름</th>
<th>나이</th>
<th>주소</th>
</tr>
</thead>
<tbody id="friend">
<tr>
<td>파프리카</td>
<td>28</td>
<td>동탄</td>
</tr>
<tr>
<td>당근</td>
<td>24</td>
<td>사당</td>
</tr>
<tr>
<td>포도</td>
<td>27</td>
<td>분당</td>
</tr>
</tbody>
</table>
</div>
</body>
</html>
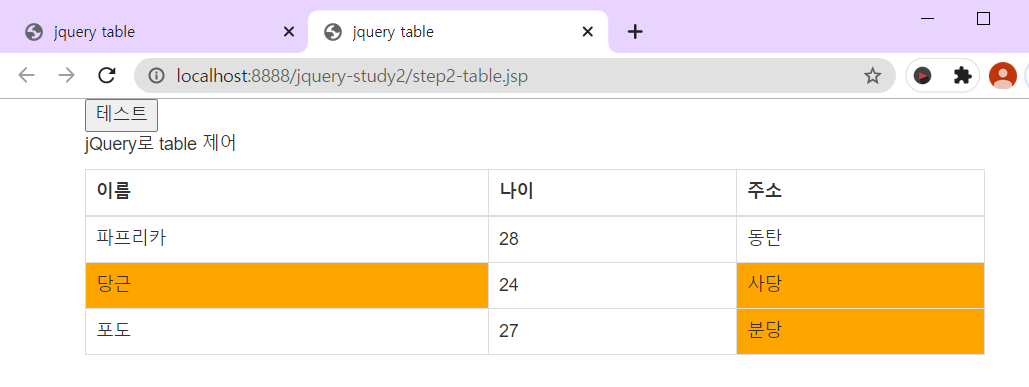
0. 처음 화면
1_1. '테스트' 버튼 눌렀을 때, 마지막=3번째 row(tr) 만 css가 적용됨

or
1_2. '테스트' 버튼 눌렀을 때, '당'이 포함된 td만 css가 적용됨
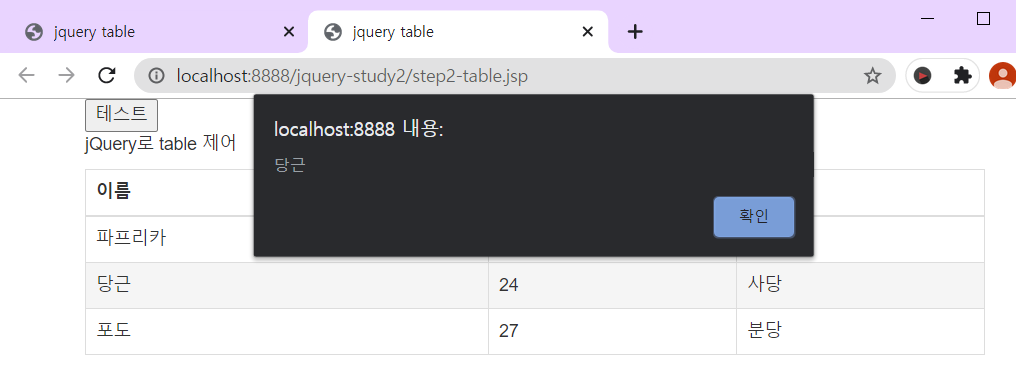
2. 아무 td나 눌렀을 때, 본인의 text가 alert에 출력됨
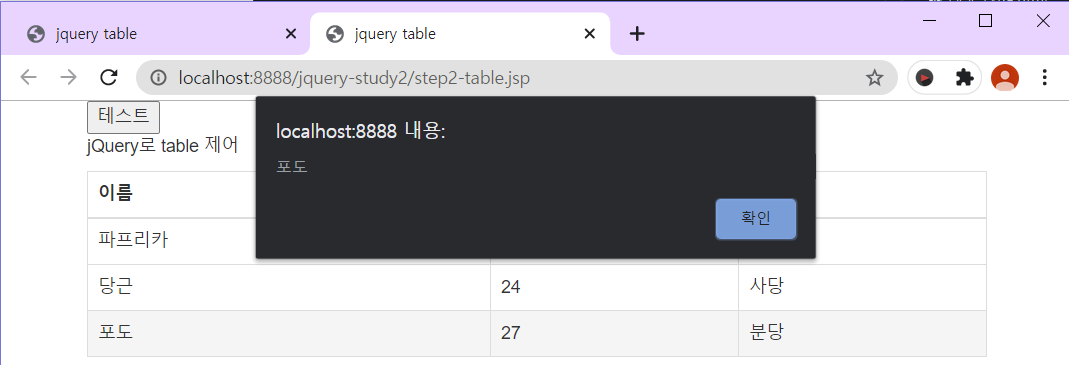
3. 같은 row에 어떤 td를 클릭하든, 해당 row(DB)의 PK가 alert되도록 !
(클릭된 td의 상위(부모) tr로 이동하여, tr이 가진 첫번째 td의 text를 선택하여 출력)
=> '포도'줄의 27을 눌러도 '포도'가 나옴
3. Toggle (정보 더보기/접기)
$(selector).slideToggle([second] , 하위 function() { })
<%@ page language="java" contentType="text/html; charset=UTF-8"
    pageEncoding="UTF-8"%>
<!DOCTYPE html>
<html>
<head>
<meta charset="UTF-8">
<meta name="viewport" content="width=device-width, initial-scale=1">
  <link rel="stylesheet" href="https://maxcdn.bootstrapcdn.com/bootstrap/3.4.1/css/bootstrap.min.css">
  <script src="https://ajax.googleapis.com/ajax/libs/jquery/3.5.1/jquery.min.js"></script>
  <script src="https://maxcdn.bootstrapcdn.com/bootstrap/3.4.1/js/bootstrap.min.js"></script>
<title>step1-toggle</title>
<style type="text/css">
	#toggleSpan{
		background-color: yellow;
	}
	#detailInfo{
		display: none;
	}
</style>
<script type="text/javascript">
    /* 정보 더보기와 접기가 번갈아 가면서 표현된다
	   detailInfo의 정보가 보이는 상태이면 접기가 표현되고
	   detailInfo의 정보가 보이지 않는 상태이면 정보 더보기가 표현된다
	   toggleSpan 을 클릭하면 아래 detailInfo가 보이는 상태와
	   보이지 않는 상태로 번갈아 가면서 수행한다 	*/

   	$(document).ready(function() {

		$("#toggleSpan").click(function() {
			$("#detailInfo").slideToggle(1000,function(){
				//상세정보가 보이지 않는 상태이면 true
				if($(this).css("display") == "none"){ //정보 보이지 않는 상태
					$("#toggleSpan").text("정보 더보기");
				} else { // 정보 보이는 상태
					$("#toggleSpan").text("정보 접기");
				}
			});
		});

	});

</script>
</head>
<body>
	<span id="toggleSpan">정보 더보기</span>

	<br><br>

	<p id="detailInfo">
		본명
		이지은(李知恩)[1]<br><br>
		출생
		1993년 5월 16일, 서울특별시 성동구 송정동[2] / 24세<br><br>
		국적
		대한민국파일:대한민국 국기.png<br><br>
		본관
		전주 이씨[3]<br><br>
		신체
		161.7cm, 44kg[4][5], A형<br><br>
		가족
		부모님, 남동생<br><br>
	</p>
</body>
</html>
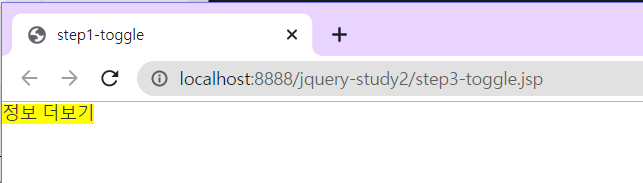
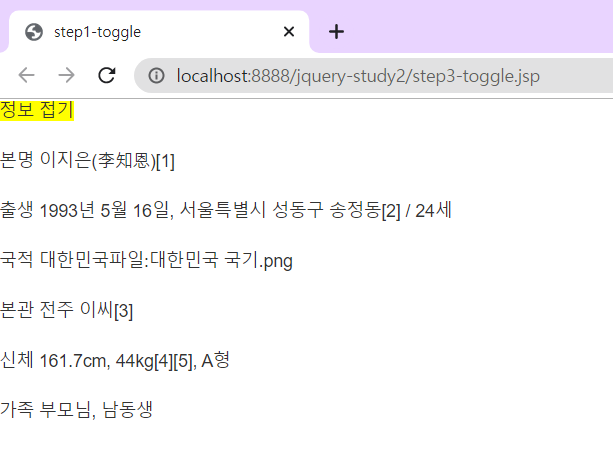
1. 처음 상태
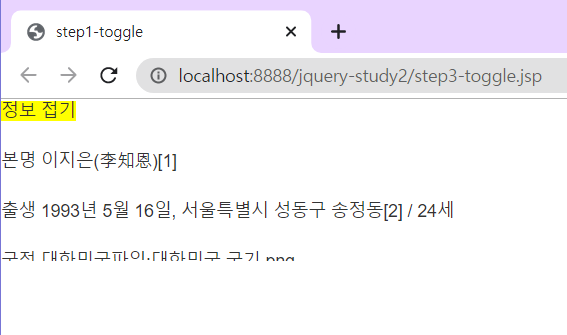
2. '정보 더보기' 누르면 정보 나옴 (아래로 스르륵) -> '정보 접기'로 변경됨
3. '정보 접기' 누르면 위로 스르륵 정보 사라짐 -> <span> 영역이 '정보 더보기'로 변경됨
4. From tag 제어 (select / option / radio / checkbox)
> radio 제어
$("selector[Form] (한칸 공백) :radio[name=[name] ]:checked()")
> check box 제어
$("selector[Form] (한칸 공백) :checkbox[name=[name] ]:checked()")
<%@ page language="java" contentType="text/html; charset=UTF-8"
pageEncoding="UTF-8"%>
<!DOCTYPE html>
<html>
<head>
<meta charset="UTF-8">
<meta name="viewport" content="width=device-width, initial-scale=1">
<link rel="stylesheet" href="https://maxcdn.bootstrapcdn.com/bootstrap/3.4.1/css/bootstrap.min.css">
<script src="https://ajax.googleapis.com/ajax/libs/jquery/3.5.1/jquery.min.js"></script>
<script src="https://maxcdn.bootstrapcdn.com/bootstrap/3.4.1/js/bootstrap.min.js"></script>
<title>form</title>
<script type="text/javascript">
$(document).ready(function () {
//Form에 대한 submit
$("#testForm").submit(function() {
//alert("submit");
//Changing:
// id=userId인 입력양식의 value의 정보를 보여준 후,
// 확인을 누르면 삭제한 후 focus를 준다
alert($("#userId").val());
$("#userId").val("").focus();
/* select option value를 출력 */
alert($("#hp").val());
/* radio value를 출력
: radio button은 특성상 동일한 이름을 가진다(id X)
- id=testForm에서 radio name=gender인 대상을 선택하여,
사용자가 체크한 라디오 버튼의 값을 선택한다.
*/
var ra = $("#testForm :radio[name=gender]:checked()");
if (ra.length == 0){
alert("성별을 선택해주세요.");
} else {
alert(ra.val());
}
/* check box value를 출력
: testForm 하위의 체크 박스 중,
선택된 요소 값만 출력
(아무것도 출력 안했을 때, alert)
*/
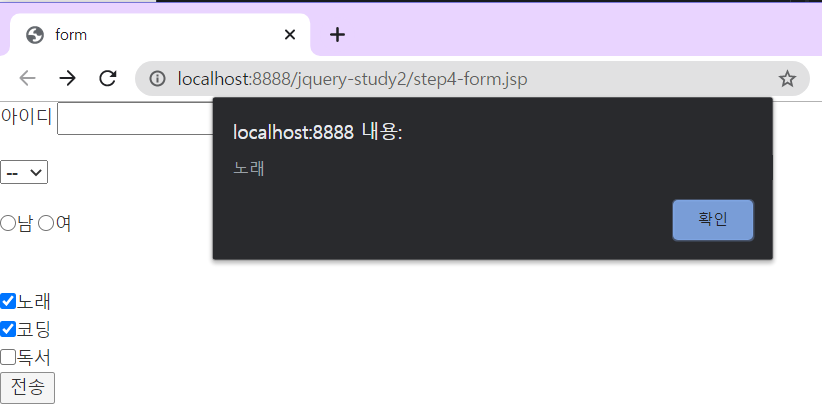
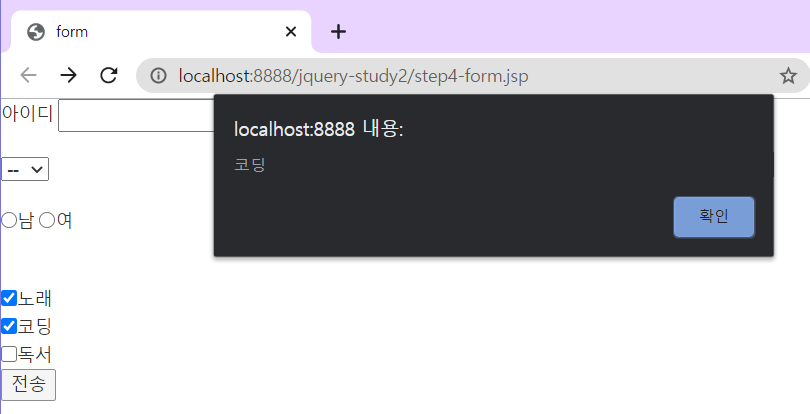
var ha = $("#testForm :checkbox[name=hobby]:checked()");
if(ha.length == 0){
alert("취미를 선택하세요");
} else {
for (var i=0; i<ha.length; i++){
//ha는 jQuery 객체지만, ha[i]는 javaScript 객체이다.
//val()은 jQuery 함수이기 때문에,
//이를 적용하기 위해서는 $(ha[i]).val()로 jQuery 객체로 만들어줘야한다.
alert($(ha[i]).val());
}
}
return false;//전송되지 않도록 한다
});
});
</script>
</head>
<body>
<form action="test.jsp" id="testForm">
아이디 <input type="text" id="userId" name="userId"><br><br>
<select id="hp">
<option value="">--</option>
<option value="sk">sk</option>
<option value="kt">kt</option>
<option value="lg">lg</option>
</select><br><br>
<input type="radio" name="gender" value="male">남
<input type="radio" name="gender" value="female">여
<br><br><br>
<input type="checkbox" name="hobby" value="노래">노래<br>
<input type="checkbox" name="hobby" value="코딩">코딩<br>
<input type="checkbox" name="hobby" value="독서">독서<br>
<input type="submit" value="전송">
</form>
</body>
</html>(Changing 연습)
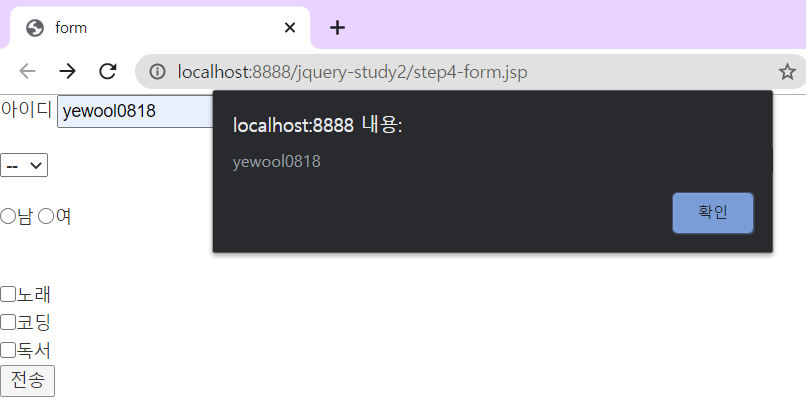
1. id=userId인 입력양식의 value를 alert후,
확인 누르면 내용 지우고, 다시 userId에 focus 된다.
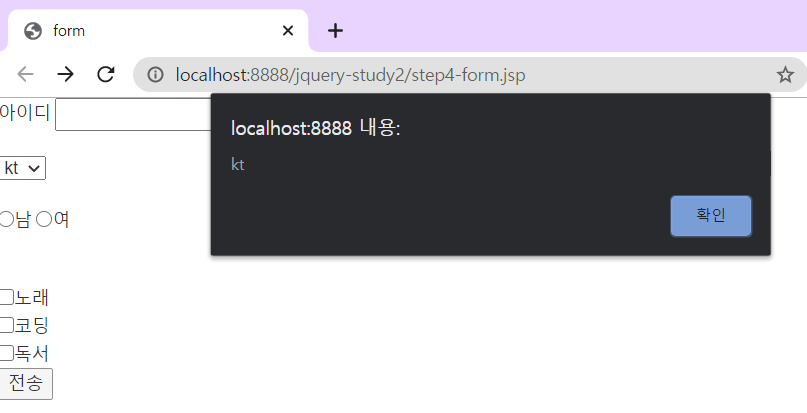
2. select / option - 통신사 선택 후 '전송' 누르면 선택 값(option) 뜬다
3_1. radio(성별선택) 에서 아무것도 성별 선택 안했을 때,
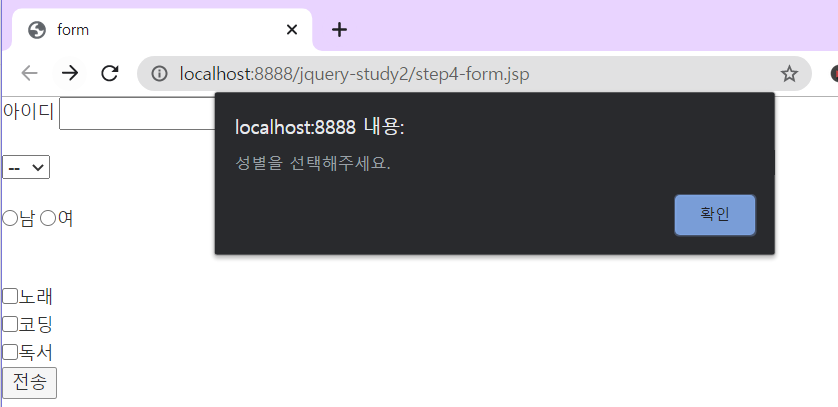
3_2. '여'를 선택했을 때,

4_1. check box에서 아무것도 선택하지 않았을 때,
4_2. check box에서 선택한 값 출력됨
5. MouseEnter로 마우스 움직임 감지
> 마우스 올려놨을 때 이미지 나타나기
$( [selector] ).mouseenter(function() {
$( [img selector] ).show();
});
> 마우스를 다른 곳으로 이동했을 때 이미지 사라지기
$( [selector] ).mouseleave(function() {
$( [img selector] ).hide();
});
> 두가지를 한번에 처리 ! : hover(fn1: mouseIn , fn2 : mouseOut)
$( [selector] ).hover(function() {
$( [img selector] ).show();
}, function() {
$([img selector] ).hide();
});
<%@ page language="java" contentType="text/html; charset=UTF-8"
pageEncoding="UTF-8"%>
<!DOCTYPE html>
<html>
<head>
<meta charset="UTF-8">
<meta name="viewport" content="width=device-width, initial-scale=1">
<link rel="stylesheet"
href="https://maxcdn.bootstrapcdn.com/bootstrap/3.4.1/css/bootstrap.min.css">
<script
src="https://ajax.googleapis.com/ajax/libs/jquery/3.5.1/jquery.min.js"></script>
<script
src="https://maxcdn.bootstrapcdn.com/bootstrap/3.4.1/js/bootstrap.min.js"></script>
<title>step4-mouseenter.jsp</title>
<style type="text/css">
#friendImg {
display: none;
}
span {
background-color: yellow;
font-size: 25px;
}
</style>
<script type="text/javascript">
/* infoSpan 영역에 마우스가 진입되면 friendImg가 보이게 한다
mouseenter(function(){}) show()
infoSpan 영역에서 마우스가 나가면 friendImg가 안보이게 한다
mouseleave(function(){}) hide() */
$(document).ready(function() {
/* $("#infoSpan").mouseenter(function() {
$("#friendImg").show();
});
$("#infoSpan").mouseleave(function() {
$("#friendImg").hide();
});*/
//위 두 이벤트를 한번에 처리 (hover(fn1, fn2))
$("#infoSpan").hover(function(){
$("#friendImg").show()
}, function(){
$("#friendImg").hide();
});
});
</script>
</head>
<body>
<div class="container">
<span id="infoSpan">마우스를 올려보세요</span><br> <br>
<img src="아이유.jpg" class="img-circle" id="friendImg"
width="304" height="236">
</div>
</body>
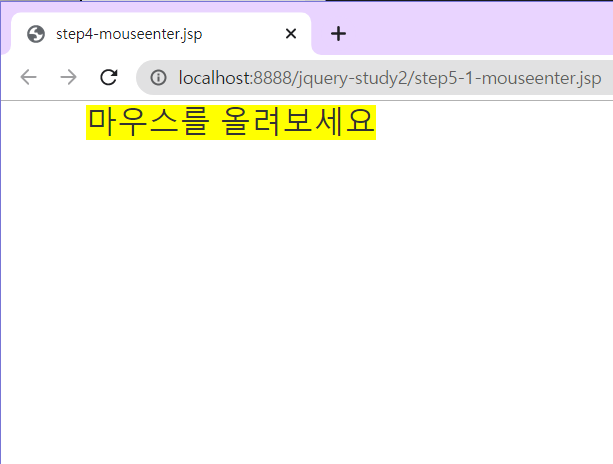
</html>1. <span>영역에 마우스를 올렸을 때,

2. <span>영역에 마우스를 올리지 않았을 때,
5_1. hover로 마우스 움직임 감지
<%@ page language="java" contentType="text/html; charset=UTF-8"
pageEncoding="UTF-8"%>
<!DOCTYPE html>
<html>
<head>
<meta charset="UTF-8">
<meta name="viewport" content="width=device-width, initial-scale=1">
<link rel="stylesheet" href="https://maxcdn.bootstrapcdn.com/bootstrap/3.4.1/css/bootstrap.min.css">
<script src="https://ajax.googleapis.com/ajax/libs/jquery/3.5.1/jquery.min.js"></script>
<script src="https://maxcdn.bootstrapcdn.com/bootstrap/3.4.1/js/bootstrap.min.js"></script>
<title>step5-hover.jsp</title>
<script type="text/javascript">
$(document).ready(function() {
$("#membody td").hover(function(){
//마우스 올렸을 때
$(this).css("background-color", "orange");
$("#memInfo").html("<font color=blue>"+ $(this).text() + "</font>");
}, function() {
//마우스 안올렸을 때
$(this).css("background-color", "white");
$("#memInfo").text("");//span 비우기
})
});
</script>
</head>
<body>
<div class="container">
<div class="row">
<!-- offset: 2비중만큼 오른쪽으로 이동 -->
<div class="col-sm-8 col-sm-offset-2">
<table class="table table-bordered">
<thead>
<tr>
<th>ID</th>
<th>NAME</th>
<th>ADDR</th>
</tr>
</thead>
<tbody id="membody">
<tr>
<td>java</td>
<td>아이유</td>
<td>하와이</td>
</tr>
<tr>
<td>jquery</td>
<td>김태리</td>
<td>울릉도</td>
</tr>
<tr>
<td>ajax</td>
<td>강동원</td>
<td>백령도</td>
</tr>
</tbody>
</table>
<span id="memInfo"></span>
</div>
</div>
<!-- row -->
</div>
<!-- container -->
</body>
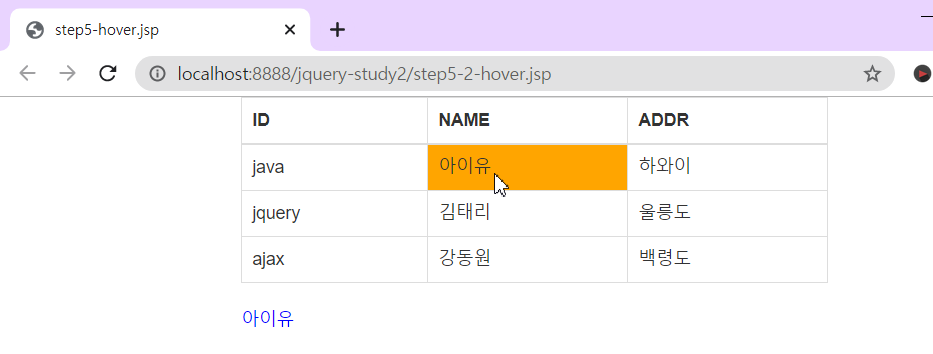
</html>1. thead 부분에는 마우스를 올려도 반응 X
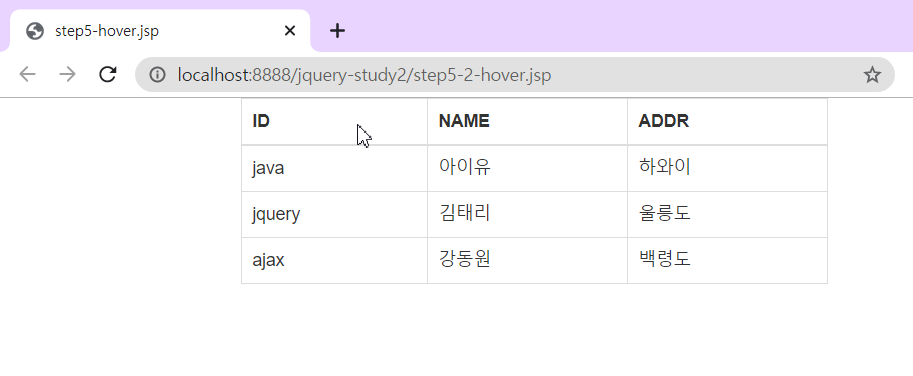
2. tbody 부분에는 마우스를 올려도 반응 O (CSS 적용) + td value 출력
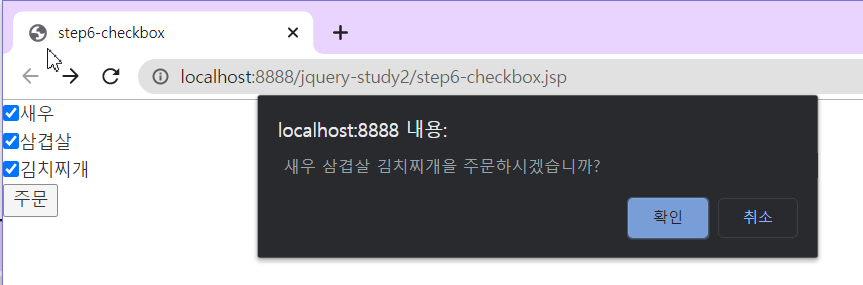
6. CheckBox 체크박스 - 변수 누적
<%@ page language="java" contentType="text/html; charset=UTF-8"
pageEncoding="UTF-8"%>
<!DOCTYPE html>
<html>
<head>
<meta charset="UTF-8">
<meta name="viewport" content="width=device-width, initial-scale=1">
<link rel="stylesheet" href="https://maxcdn.bootstrapcdn.com/bootstrap/3.4.1/css/bootstrap.min.css">
<script src="https://ajax.googleapis.com/ajax/libs/jquery/3.5.1/jquery.min.js"></script>
<script src="https://maxcdn.bootstrapcdn.com/bootstrap/3.4.1/js/bootstrap.min.js"></script>
<title>step6-checkbox</title>
<script type="text/javascript">
/* submit 버튼 누르면
menu 체크박스에 선택된 정보가 없으면
메뉴를 선택하세요 alert 후 전송시키지 않는다
선택 정보가 있으면
삼겹살 김치찌개 주문 이라는 선택정보를
alert 으로 표현한 후 confirm 으로
삼겹살 김치찌개 주문하시겠습니까 확인 누르면 전송
취소누르면 전송하지 않는다 */
$(document).ready(function() {
//Form에 대한 submit
$("#menuForm").submit(function() {
var ma = $("#menuForm :checkbox[name=menu]:checked()");
if (ma.length == 0) {
alert("메뉴를 선택하세요.");
return false;
} else {
//변수에 누적
var menu = "";
for (var i = 0; i < ma.length; i++) {
menu += " "+($(ma[i]).val());
}
}
return confirm(menu + "을 주문하시겠습니까?");
});
});
</script>
</head>
<body>
<form action="test.jsp" id="menuForm">
<input type="checkbox" name="menu" value="새우">새우<br>
<input type="checkbox" name="menu" value="삼겹살">삼겹살 <br>
<input type="checkbox" name="menu" value="김치찌개">김치찌개<br>
<input type="submit" value="주문">
</form>
</body>
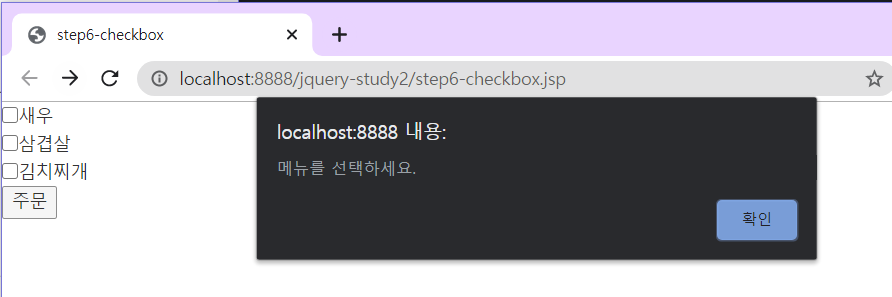
</html>1. 아무 것도 선택 안했을 때,
2. 선택 했을 때,
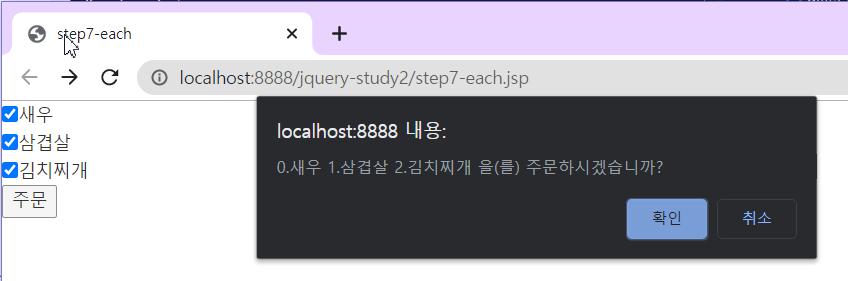
7. Loop 반복문 (Each)
[array] . each( function ( [index] ) { }).[후속이벤트]
<%@ page language="java" contentType="text/html; charset=UTF-8"
    pageEncoding="UTF-8"%>
<!DOCTYPE html>
<html>
<head>
<meta charset="UTF-8">
<meta name="viewport" content="width=device-width, initial-scale=1">
  <link rel="stylesheet" href="https://maxcdn.bootstrapcdn.com/bootstrap/3.4.1/css/bootstrap.min.css">
  <script src="https://ajax.googleapis.com/ajax/libs/jquery/3.5.1/jquery.min.js"></script>
  <script src="https://maxcdn.bootstrapcdn.com/bootstrap/3.4.1/js/bootstrap.min.js"></script>
<title>step7-each</title>
<script type="text/javascript">

$(document).ready(function() {

	  //Form에 대한 submit
	  $("#menuForm").submit(function() {
		var ma = $("#menuForm :checkbox[name=menu]:checked()");
		var menu = "";
		if (ma.length == 0) {
			alert("메뉴를 선택하세요.");
			return false;
		} else {
		/*	for (var i = 0; i < ma.length; i++) {
				menu += " "+($(ma[i]).val());
			}*/

			//jQuery Style로 each를 이용한다
			ma.each(function(index) {
				menu += index+"."+ $(this).val()+" ";
			}).fadeOut(5000);
		}
		return confirm(menu + "을(를) 주문하시겠습니까?");

	  });

});

</script>
</head>
<body>
<form action="test.jsp" id="menuForm">
<input type="checkbox" name="menu" value="새우">새우<br>
<input type="checkbox" name="menu" value="삼겹살">삼겹살 <br>
<input type="checkbox" name="menu" value="김치찌개">김치찌개<br>
<input type="submit" value="주문">
</form>
</body>
</html>
1. 메뉴 모두 골랐을 때, (index가 붙음)
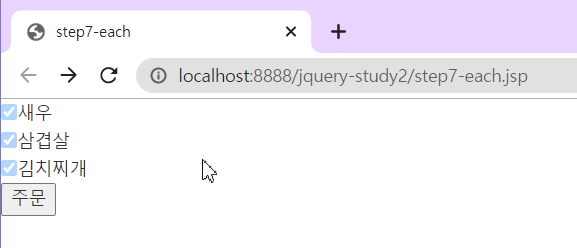
2. 취소 누르면 fadeOut이 실행되어 체크박스가 서서히 사라짐
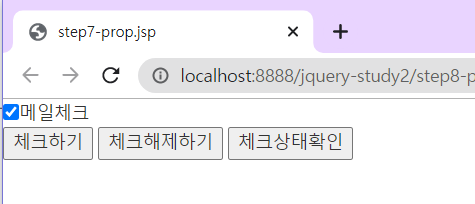
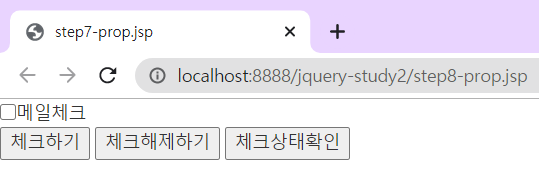
8. Prop - checkbox의 체크 상태 제어
$( [checkbox id] ).prop("checked", [boolean] );
>체크 상태 확인 : true or false로 반환됨
$( [checkbox id] ).prop("checked");
<%@ page language="java" contentType="text/html; charset=UTF-8"
pageEncoding="UTF-8"%>
<!DOCTYPE html>
<html>
<head>
<meta charset="UTF-8">
<meta name="viewport" content="width=device-width, initial-scale=1">
<link rel="stylesheet" href="https://maxcdn.bootstrapcdn.com/bootstrap/3.4.1/css/bootstrap.min.css">
<script src="https://ajax.googleapis.com/ajax/libs/jquery/3.5.1/jquery.min.js"></script>
<script src="https://maxcdn.bootstrapcdn.com/bootstrap/3.4.1/js/bootstrap.min.js"></script>
<title>step7-prop.jsp</title>
<script type="text/javascript">
$(document).ready(function() {
//1. 체크하기
$("#checkBtn1").click(function() {
//mailing 체크박스를 체크상태로 만든다.
$("#mailing").prop("checked", true);
});
//2. 체크해제하기
$("#checkBtn2").click(function() {
//mailing 체크박스를 체크해제 상태로 만든다.
$("#mailing").prop("checked", false);
});
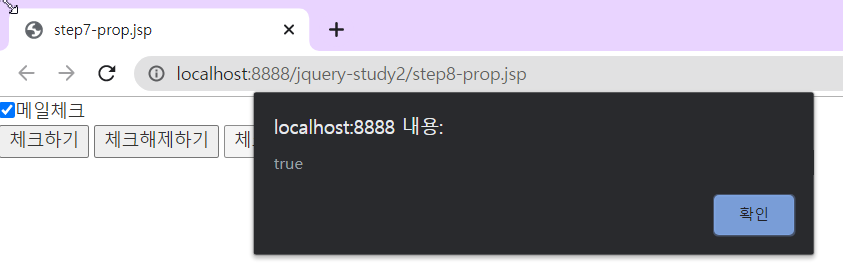
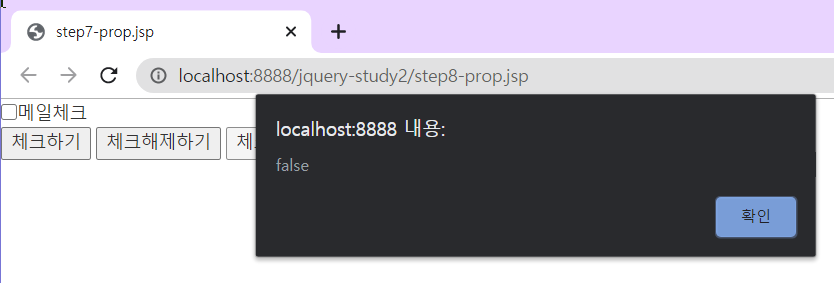
//3. 체크상태 확인
$("#checkBtn3").click(function() {
//mailing 체크박스의 체크상태를 확인한다.
alert($("#mailing").prop("checked"));
});
});
</script>
</head>
<body>
<input type="checkbox" id="mailing">메일체크<br>
<input type="button" id="checkBtn1" value="체크하기">
<input type="button" id="checkBtn2" value="체크해제하기">
<input type="button" id="checkBtn3" value="체크상태확인">
</body>
</html>1. '체크하기' 버튼 눌렀을 때,
2. '체크해제 하기' 버튼 눌렀을 때,
3. '체크상태 확인' 버튼 눌렀을 때
- 체크 되어있을 경우
- 안되어있을 경우
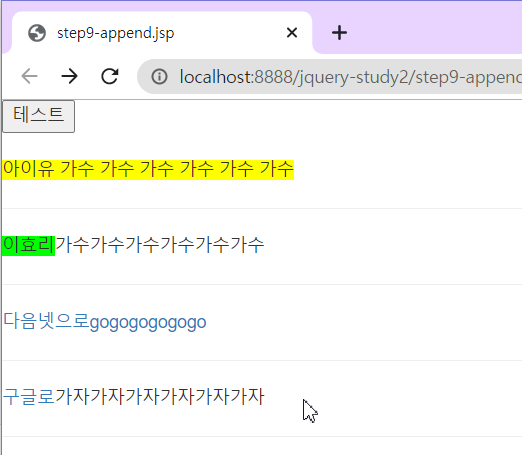
9. append / after
> Append : 대상 요소에 마지막 자식(하위) 요소로 정보를 추가해주는 jQuery 함수
$(selector).append( [value] );
> After : 대상 요소에 형제 요소로 정보를 추가해주는 jQuery 함수
$(selector).after( [value] );
<%@ page language="java" contentType="text/html; charset=UTF-8"
    pageEncoding="UTF-8"%>
<!DOCTYPE html>
<html>
<head>
<meta charset="UTF-8">
<meta name="viewport" content="width=device-width, initial-scale=1">
  <link rel="stylesheet" href="https://maxcdn.bootstrapcdn.com/bootstrap/3.4.1/css/bootstrap.min.css">
  <script src="https://ajax.googleapis.com/ajax/libs/jquery/3.5.1/jquery.min.js"></script>
  <script src="https://maxcdn.bootstrapcdn.com/bootstrap/3.4.1/js/bootstrap.min.js"></script>
<title>step9-append.jsp</title>
<style type="text/css">
	#span1{
		background-color: yellow;
	}
	#span2{
		background-color: lime;
	}
</style>

<script type="text/javascript">
	$(document).ready(function(){

		$("#testBtn").click(function() {
			//대상 요소에 마지막 자식(하위) 요소로 정보를 추가
			$("#span1").append(" 가수");

			//대상 요소에 마지막 형제 요소로 정보를 추가
			$("#span2").after("가수");

			//href에 daum이 포함된 곳에 정보 append
			$("a[href *= daum]").append("go");

			//href에 google이 포함된 곳에 정보 after
			$("a[href *= google]").after("가자");
		})
	})
</script>

</head>
<body>
<input type="button" id="testBtn" value="테스트"><br><br>
<span id="span1">아이유</span><hr>
<span id="span2">이효리</span><hr>
<a href="http://daum.net">다음넷으로</a><hr>
<a href="http://google.com">구글로</a><hr>
</body>
</html>
1. 테스트 버튼을 누르면 아래와 같이 이어짐 (누를 때마다 요소가 추가됨)
> append: 자식으로 들어가는 경우 tag안에 들어가 속성을 이어서 가져감
> atfer : 형제 요소로 들어가는 경우 tag 밖으로 들어가서 속성을 이어가지 못함
10. Select-option 동적 생성
<%@ page language="java" contentType="text/html; charset=UTF-8"
    pageEncoding="UTF-8"%>
<!DOCTYPE html>
<html>
<head>
<meta charset="UTF-8">
<title></title>
<meta name="viewport" content="width=device-width, initial-scale=1">
<link rel="stylesheet" href="https://maxcdn.bootstrapcdn.com/bootstrap/3.4.1/css/bootstrap.min.css">
<script src="https://ajax.googleapis.com/ajax/libs/jquery/3.5.1/jquery.min.js"></script>
<script src="https://maxcdn.bootstrapcdn.com/bootstrap/3.4.1/js/bootstrap.min.js"></script>
<script type="text/javascript">
	$(document).ready(function() {

		//생성
		$("#createOption").click(function() {
			var arr = ["손흥민", "이강인", "황의조"];
			for (var i = 0; i < arr.length; i++) {
				$("#friend").append("<option value=" + arr[i] + ">" + arr[i] + "</option>");
			}
		})

		//삭제
		$("#deleteOption").click(function() {
			$("#friend").empty(); //자식요소 삭제 = 옵션 삭제
		})

	})
</script>
</head>
<body>
<div class="container">
	<input type="button" value="셀렉트 옵션 생성" id="createOption">
	<input type="button" value="셀렉트 옵션 삭제" id="deleteOption">
	<select id = "friend"></select>
</div>
</body>
</html>
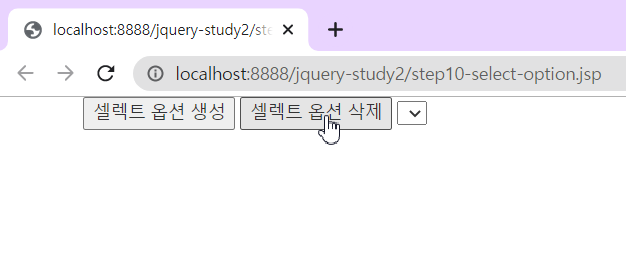
1. '셀렉트 옵션 생성' 클릭 시 => select에 option 요소 생성됨
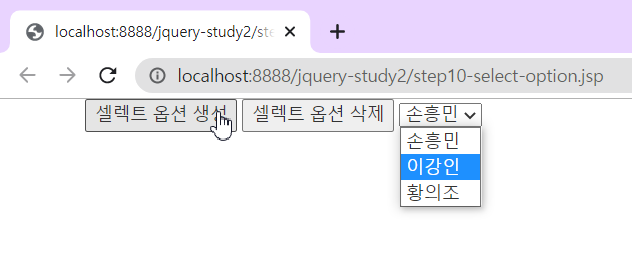
2. '셀렉트 옵션 삭제' 클릭 시 => select에 option 요소 사라짐
11. next / prev 값 찾기
> next() : 클릭된 요소의 다음 요소에 클릭된 요소의 텍스트를 할당
만들 때 : $(this).next().text($(this).text());
지울 때 : $(selector).next().text("");
> prev() : 클릭된 요소의 이전 요소에 클릭된 요소의 텍스트를 할당
찾을 때 : $(this).prev().text($(this).text());
: prev()는 여러 번 이어서 사용할 수 있다. (ex. $(this).prev().prev() ... )
1. '스타벅스' 혹은 다른 <span> 요소 클릭
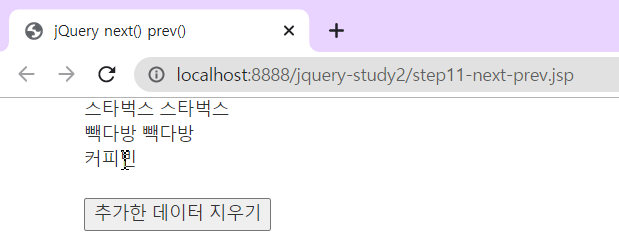
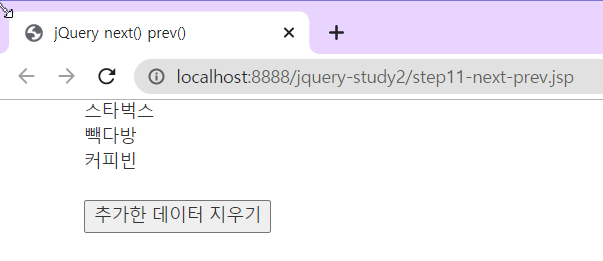
2.'추가한 데이터 지우기' 버튼 클릭 => 추가된 <span> 요소 모두 삭제됨
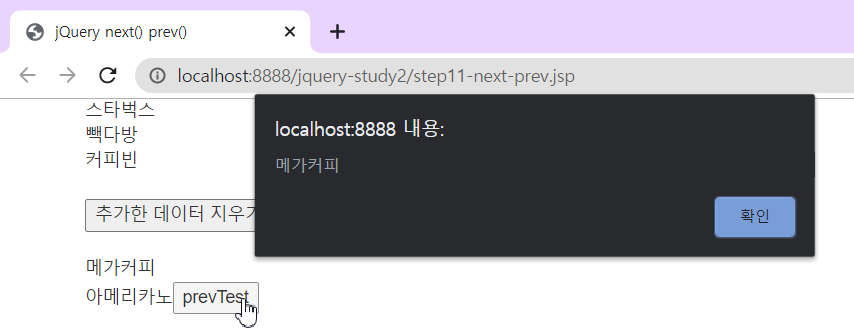
3. 'prevTest' 버튼 클릭 => 현재 버튼의 이전요소(아메리카노)의 이전요소(<br>)의 이전요소 텍스트(=메가커피) 출력
12.ON : 새로 생성된 버튼 동작 가용 기능
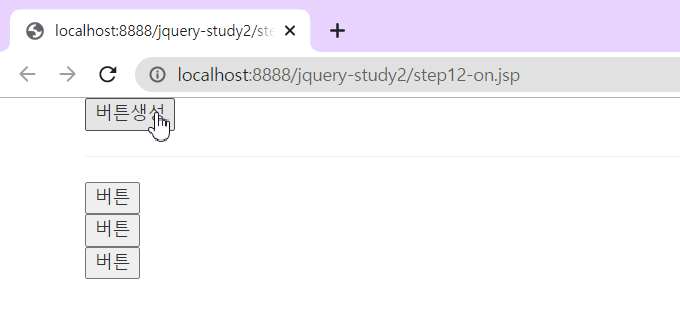
'버튼 생성' 버튼을누르면 testDiv영역에 동적으로 버튼을 생성한다.
로딩 시에 존재하지 않던 버튼을 동작하게 하기 위해 "on"이 필요하다.
$(셀렉트 대상의 부모요소).on(이벤트 타입, 대상요소, 동작할 익명함수);
<%@ page language="java" contentType="text/html; charset=UTF-8"
pageEncoding="UTF-8"%>
<!DOCTYPE html>
<html>
<head>
<meta charset="UTF-8">
<title></title>
<meta name="viewport" content="width=device-width, initial-scale=1">
<link rel="stylesheet" href="https://maxcdn.bootstrapcdn.com/bootstrap/3.4.1/css/bootstrap.min.css">
<script src="https://ajax.googleapis.com/ajax/libs/jquery/3.5.1/jquery.min.js"></script>
<script src="https://maxcdn.bootstrapcdn.com/bootstrap/3.4.1/js/bootstrap.min.js"></script>
<script type="text/javascript">
//'버튼 생성' 버튼을누르면 testDiv영역에 동적으로 버튼을 생성한다.
$(document).ready(function() {
$("#createBtn").click(function() {
//최초 화면 로딩 시에는 존재하지 않는
//testBtn class 버튼이 동적으로 생성된다.
var btn = "<input type='button' value='버튼' class='testBtn'><br>";
$("#testDiv").append(btn);
});
//로딩 시에는 .testBtn 버튼이 존재하지 않으므로,
//아래 이벤트는 동작하지 않는다.
/* $(".testBtn").click(function() {
alert("클릭했군요!");
}) */
//동적으로 생성되는 요소에 대한 이벤트 등록은
//jQuery의 on 함수를 이용한다.
//on(이벤트, 대상, 행위)
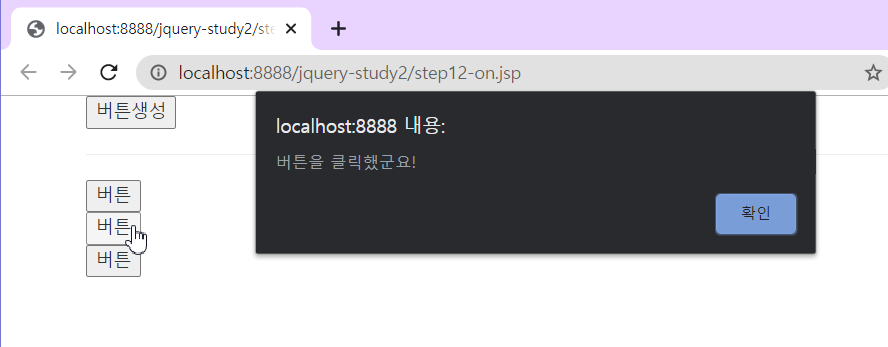
$("#testDiv").on("click", ".testBtn", function() {
alert($(this).val() + "을 클릭했군요!");
})
});
</script>
</head>
<body>
<div class="container">
<input type="button" value="버튼생성" id="createBtn">
<hr>
<div id="testDiv"></div>
</div>
</body>
</html>1. '버튼 생성' 버튼 클릭 => 버튼들이 testDiv 영역에 추가됨
2. '버튼' 클릭 => 클릭한 버튼의 val와 alert이 출력됨
'Java Web Programming > 5. JavaScript | Ajax | jQuery (JSON)' 카테고리의 다른 글
| [Ajax/jQuery] jQuery 를 활용한 Ajax 방식 프로그래밍 (0) | 2020.10.08 |
|---|---|
| [Ajax/jQuery] 제이쿼리 기초 : 시작하기 & 예제 코드 (0) | 2020.10.06 |
| [Ajax/JSON] JSON을 이용한 Ajax 통신 2 (JSON Array + JSON Object) (0) | 2020.10.06 |
| [Ajax/JSON] JSON을 이용한 Ajax 통신(JSON Object & JSON Array) (2) | 2020.10.06 |
| [Ajax/JSON] JSON Basic! (개념, 특징, 기본문법) (0) | 2020.10.06 |


